
Project: Help Article for End User
By: Khadeja Jallo | kayjallo@gmail.com
Date: 6/25/25
Context
This project reimagines Notion’s existing board view documentation for busy sales managers, walking the end user through creating a tailored CRM in Notion. The goal is to simplify onboarding, reduce friction against unfamiliar software, and demonstrate how to customize boards for CRM-style workflows.
Tools Used
Notion (software)
Microsoft Snipping Tool (screenshots)
Loom (screenshare)
Links
Click to view this project on WordPress!
Annotation Legend
🎯= UX Insight | 🧭 = Audience Context | 🧠 = Writer’s Note | 🛠️ = AI Strategy

How to Create a Board in Notion to Track Leads for Sales Managers
Inflexible spreadsheets are not always the best solution for visualizing and managing sales opportunities as they move through the sales pipeline.
Notion boards give you an “At a glance” perspective from lead development to close.
In this Article
You will learn to use Notion boards to track leads, deal stages and follow ups through stages in the business development process.
By the end of this guide, you’ll have a visual board that helps track deals, monitor progress, and manage your sales pipeline in one place.
Contents
🎯 UX Insight: Using toggled menu items helps prevent information overload and improves readability.
Create a Page
Create a New Board
Customize Your Columns
Add / Edit a New Group
Add/ Edit New Property
Group by Different Property
Add / Edit a Subgroup
Reorder Columns and Cards
Change Card Size
Display Datapoints on Cards
Display Properties on Cards
Display Page Content on Cards
Hide Columns
Using Calculations
Using Notion AI
FAQs
CREATE A PAGE
🧭 Audience Context: The section below assumes the user is unfamiliar with Notion and describes a few ways to create a new page.
Every page in Notion is a blank canvas where you can add any content you like. There are a few ways to create a page.
- Click the New page icon near the top of your left sidebar.
🎯 UX Insight: “New page” is in bold font in accordance with MS style guide conventions.
- Hover over an existing page or folder and click the plus symbol. This will create a sub-page within the page or folder you hovered .
- Once your page has been created, you can give it a name.
CREATE A BOARD
Keeping track of business opportunities and stages in the development process is crucial. Boards can help you visualize sales opportunities as they move through development stages. Here’s how to create your CRM board:
- Hover over any of your exiting pages or folders and click the plus symbol.
- Look for the Get Started section at the bottom of the page, click the three dot menu icon and select Board from the list.
- To add a page to your board, hover over one of your columns and click the plus symbol.
CUSTOMIZE YOUR COLUMNS
Creating custom columns to help visualize your customers as they move through the sales pipeline is the key to creating a functional workflow.
Add / Edit a New Group
You can change the labels on the default groups or create new ones. You’ll need to edit the property to accomplish this. Think of properties as columns in a spreadsheet or tags you assign to each card. They help you organize, group, and search your content across views.
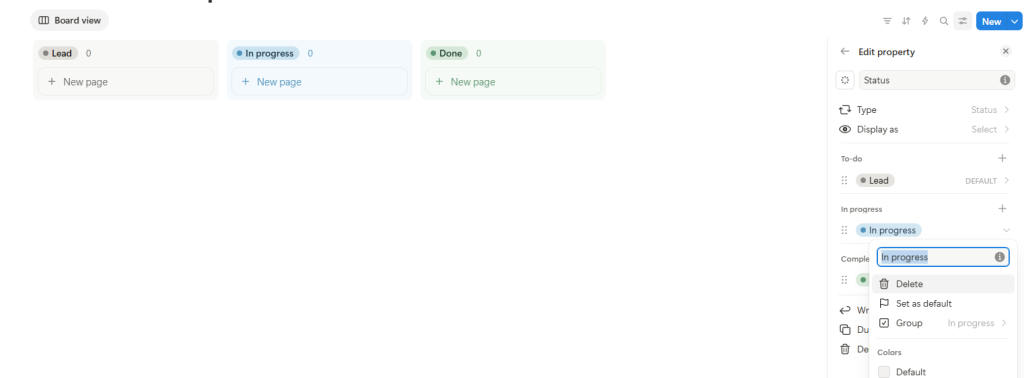
To add a new Group:
- Click the settings icon to the right of your board and go to Edit properties.
- Select the property you are currently grouping by. The default property is status. To add a new status option, click the plus symbol in the status category of your choice.
- To edit an existing status label, click on any of the existing status options to change the name or color.
🧠 Writer’s Note: The section below elaborates on the concept of “properties”. A solid understanding of the benefits and use cases of properties helps reduce cognitive friction and helps the user feel confident in using and customizing the tool.
❓ What are properties?
Add / Edit a New Property
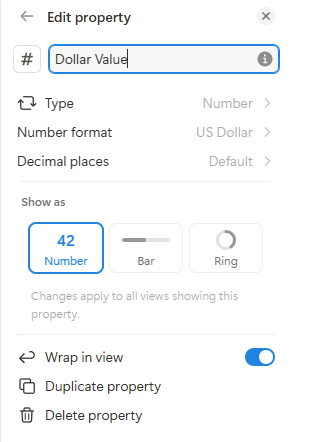
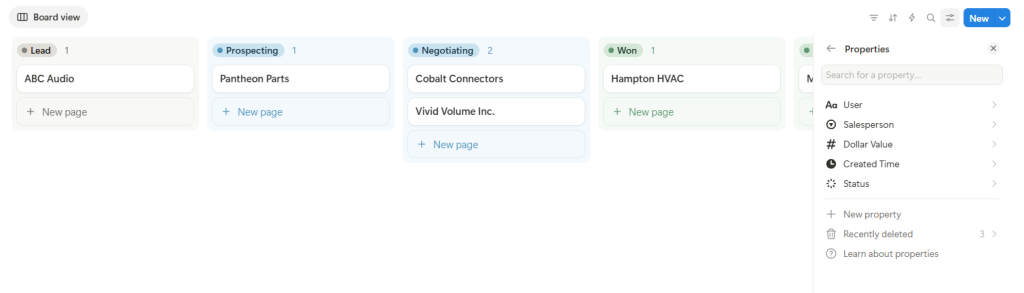
While Kanban boards typically group items by status, Notion boards can be grouped by other properties like, tags, date, priority or several other property types depending on your needs. To customize your columns for sales stages, start by doing this:
- Click the settings icon to the right of your board, go to Edit properties and select New property. Select a property from the drop down list.
- Your new property will now appear in your properties list on the Edit property page.
Group by Different Property
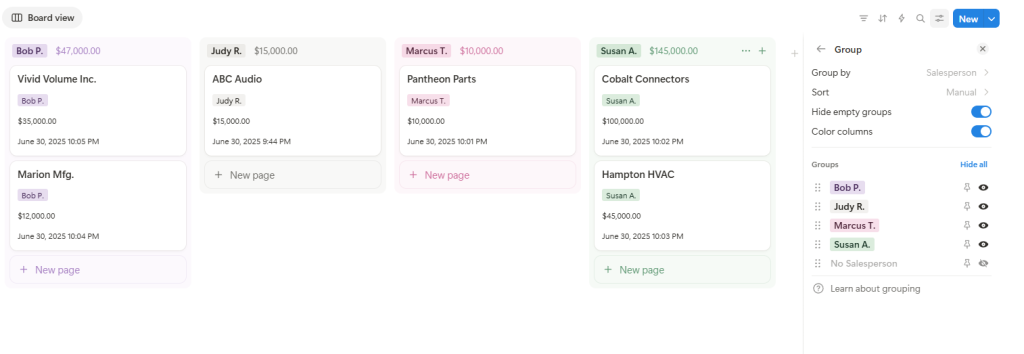
If you would like to group your columns by a different property, do this:
- Click the settings icon to the right of your board, select Group, and then select, Group by.
- Select the property that you would like to group by. The checkmark next to the property indicates that it is selected.
Add / Edit a Subgroup
You can add a second layer of groups called sub-groups. This lets you further organize your database items.
- Click the settings icon to the right of your board, select Sub-group, and select an existing property to group by.
- Each sub-group includes a toggle so you can quickly hide and show sub-groups in your board.
Reorder Columns and Cards
You can use drag-and-drop to rearrange the order of your board.
🧭 Audience Context: The task description below assumes a non-technical end user and includes detailed instruction for an otherwise commonplace UI feature.
- To reorder columns, click and hold a heading, move your mouse to the location you want your column, and release the click to drop the item.
- To move cards up and down columns or between columns, click and hold the card, and drag it into its new location.
Change Card Size
To change the look of your cards, you can adjust them to be sized large, medium or small.
- Click the settings icon to the right of your board and select layout.
- Click Card size to change from the default size (medium) to either large or small.
💡 TIP: Board view columns are colored by default, but you can turn this off by clicking Group at the top right, and then toggling "Color columns".
DISPLAY DATAPOINTS ON CARDS
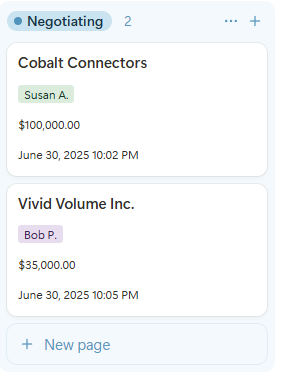
Change what is displayed on the front of your cards to quickly access customer information or see summaries of the most important information.
Display Properties on Cards
You can choose what properties to display on the front of your cards. To do this:
- Click the settings icon to the right of your board and select Property visibility.
- Click the eye icons next to the properties to make them visible or hidden.
Display Page Content on Cards
If you would like a preview of your page’s content in the front of your card,
- Click the settings icon and then click layout.
- Select Card preview to toggle between page cover , page content or none.
🧠 Writer’s Note: This following “TIP” callout provides brief instruction on adding cover images to cards. While a dedicated article heading may have been appropriate in other contexts, adding images to the header of a CRM tool is not likely to be a priority for members of this audience.
💡 TIP: To add a cover image to your page, open the page, hover near the very top and click Add cover.
HIDE COLUMNS
You can hide any columns that you do not wish to see. For example, you may want to keep a record of past wins without seeing them all on your board view. For example, you could place closed opportunities in a “wins-closed” group and hide the group from view. To hide a column:
- Hover over the column you would like hidden, click the three dot menu icon and select Hide group.
- Click the settings icon and go to Group to see all hidden and visible groups.
USING CALCULATIONS
For more advanced tracking of opportunities, timelines and dollars, you can use Notions calculation feature.
At the top of each column, you will see a gray number indicating the number of cards or items in each column. Instead, you can use this area to display other, perhaps more useful information. Here are a few ideas:
🧠 Writer’s Note: The section below describes additional board features and includes specific use cases for sales related database management.
- Count all: This calculation gives you the total number of items in each lead stage
- Earliest Date: If you have a Last edited or Created Time property in your board, you can use this calculation to show when the oldest row was edited or created and to manage lead follow ups.
- When you have a Number property in your table, you unlock several additional calculation options. If you are using the Number property to record the dollar value of each of your sales opportunities, consider the following:
- Sum: Use this to add up the dollar value of all opportunities in each development stage.
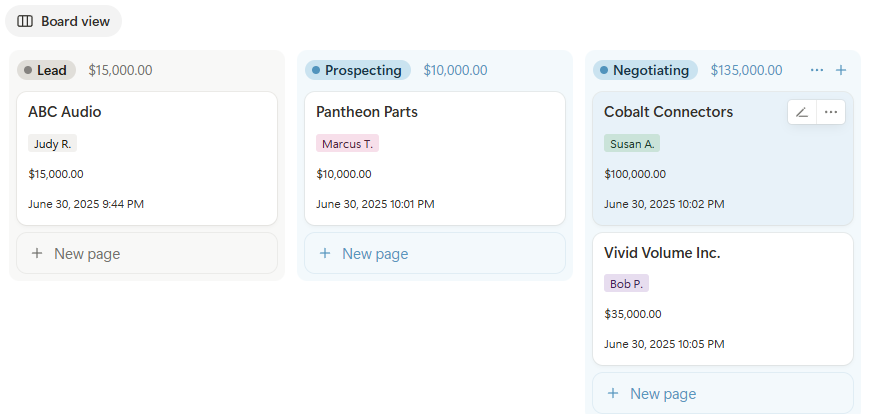
- Max: Use this to show the highest dollar value in your lead stages.
- Average: Use this to show the average dollar value in each of your lead stages.
- Sum: Use this to add up the dollar value of all opportunities in each development stage.
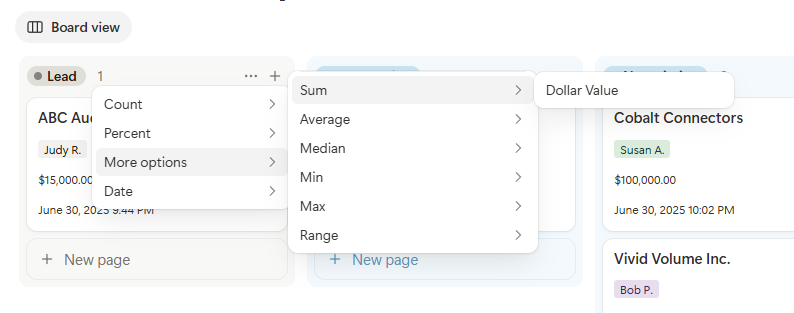
To edit this area:
- Click the gray number at the top of one of your columns.
- Go to More options and select the calculation you would like displayed.
USING NOTION AI
🛠 AI Strategy: As AI tools become more common, end-users may be motivated to interface with LLMs to stay current and ensure job security.
You can use Notion AI to Jumpstart your CRM. A clear and precise prompt can help you build your custom sales dashboard. On a new page:
- Look for the Get Started section at the bottom of the page, click Ask AI, and describe what you would like to create.
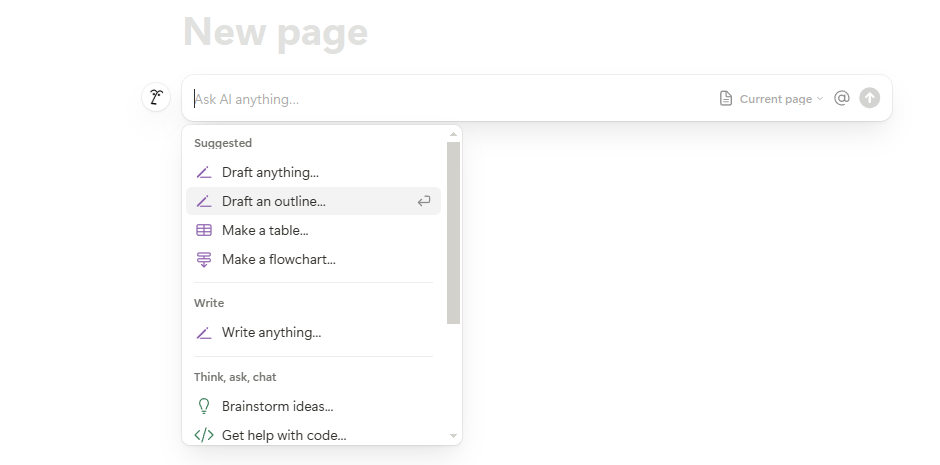
🤖 Here's an example prompt for creating your CRM dashboard:
Here are a few reminders about using AI.
- The best AI prompts clearly state the goal, are specific to the writers’ need and and include structural constraints.
- Tweak your prompt by inviting the AI to request additional details. You can also ask it for guidance in refining the prompt.
- While AI tools can help streamline workflows, a functional CRM tool will still require manual edits and customizations.
FAQs
Can I add options to any property?
You can add options to either the Select property, the Multi-select property or the Status property.
Can I view my board contents in calendar format?
Click the plus symbol next to Board View near the top of the page and select Calendar. This will create a new calendar tab in your database.